Why Are My Teddy Bear Magnolia Branches Dying? Canker, Root Stress, Wilt or Physical Damage

A dying branch on a Teddy Bear Magnolia does not automatically mean the entire tree is dying.
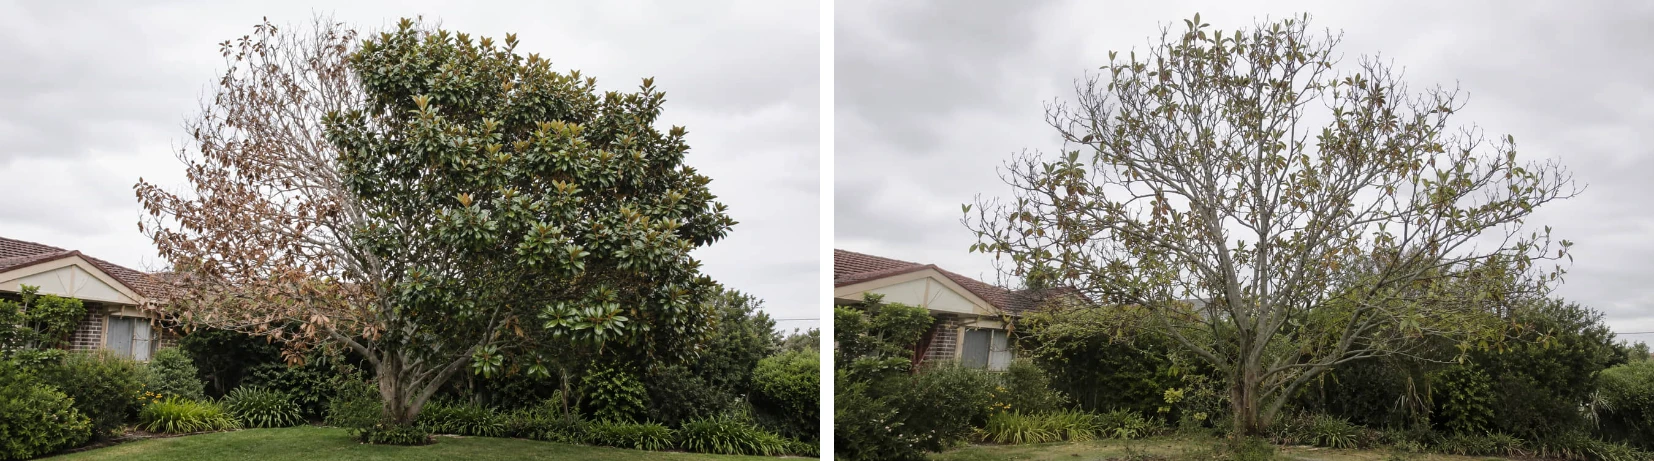
The most useful first distinction is whether the decline is limited to one branch or one side of the canopy, or whether it is affecting the whole tree.
A single dead branch can point towards local bark damage, a canker, a broken or girdled limb, root injury on one side, or damage from wind, frost, tools or construction work. Widespread thinning, small leaves, repeated twig death or decline across the canopy makes root-zone stress, planting problems, prolonged waterlogging, drought or a more serious vascular problem more plausible.
Quick diagnosis: Start at the dying branch and work backwards. Inspect the leaves, shoot tips, bark, branch junction and trunk. Then inspect the soil, root flare and recent history around the tree. Do not begin with fertiliser or a spray.
This guide begins where our Teddy Bear Magnolia leaf-spots guide ends. If the problem has moved from leaf markings into twigs, bark or whole branches, the diagnosis must move beyond the leaf surface too.
First Check: Is One Branch Dying or the Whole Tree?
The pattern of decline matters more than the colour of the leaves.
One branch or one side is declining
Look for:
- a sharp boundary between living and dead growth
- one branch with brown leaves while nearby branches remain healthy
- cracked, sunken, wounded or discoloured bark
- damage at a branch junction
- rubbing, staking, ties or wire around the stem
- a snapped, split or heavily pruned limb
- trenching, paving or soil disturbance on the same side of the tree
- one-sided exposure to hot wind, reflected heat or physical impact
A localised pattern directs attention towards the branch, bark and roots supplying that part of the canopy.
Decline is spreading across the tree
Look for:
- thinning throughout the canopy
- reduced leaf size
- pale or yellowing foliage across multiple branches
- repeated twig dieback
- weak or shortened new growth
- premature leaf drop
- soil remaining wet for long periods
- a buried root flare or mulch against the trunk
- recent transplanting
- changes to drainage, irrigation, paving or soil level
Widespread symptoms suggest that the problem may begin below ground or involve the tree’s overall water-conducting system.
Quick Diagnostic Table
| What you see | Pattern | What it may suggest | What to inspect next | Immediate mistake to avoid |
|---|---|---|---|---|
| One branch dies while nearby growth remains healthy | Localised | Bark injury, canker, broken limb or local root damage | Follow the branch back to its junction and inspect the bark on all sides | Do not treat the whole tree before locating the point where decline begins |
| A sunken, cracked or discoloured section of bark | Localised or spreading | Canker, wound response, sun injury or physical damage | Check whether the lesion is enlarging or partly encircling the branch | Do not cut into living bark merely to identify a pathogen |
| Browning begins at shoot tips and moves inward | One or several branches | Drought stress, root restriction, transplant stress or twig dieback | Check recent soil moisture, root-zone disturbance and shoot flexibility | Do not assume every brown shoot tip is a fungal disease |
| One side of the canopy declines after digging or paving | One-sided | Root severing, compaction or altered drainage | Review where machinery, trenches, concrete or soil filling occurred | Do not add fertiliser to compensate for damaged roots |
| Whole canopy becomes sparse with small or yellow leaves | Widespread | Root stress, poor aeration, waterlogging, drought or deeper decline | Inspect drainage, root flare, planting depth and root-zone moisture | Do not diagnose a nutrient deficiency from leaf colour alone |
| Recently planted tree loses vigour and develops dead shoots | Widespread or uneven | Transplant stress, root-ball drying, poor drainage or planting too deeply | Check the original root ball, root flare and moisture inside and outside the root ball | Do not follow a fixed watering calendar without checking both soil zones |
| Leaves wilt or brown but remain attached to dying branches | Localised or widespread | Rapid interruption of water movement, root failure or vascular dysfunction | Check bark, sapwood, roots and recent environmental stress | Do not claim wilt disease without professional or laboratory confirmation |
| Branches die after wind, frost, heat or mechanical impact | Exposure-related | Physical or environmental injury | Compare exposed and sheltered growth and inspect for splitting | Do not apply a pesticide to damaged tissue |
| Mushrooms, white fungal growth or decayed tissue appear near the base | Widespread risk | Root or butt decay may be involved | Avoid disturbing the area and arrange professional assessment | Do not rely on surface treatment for a structural root problem |
Follow the Dying Branch Backwards
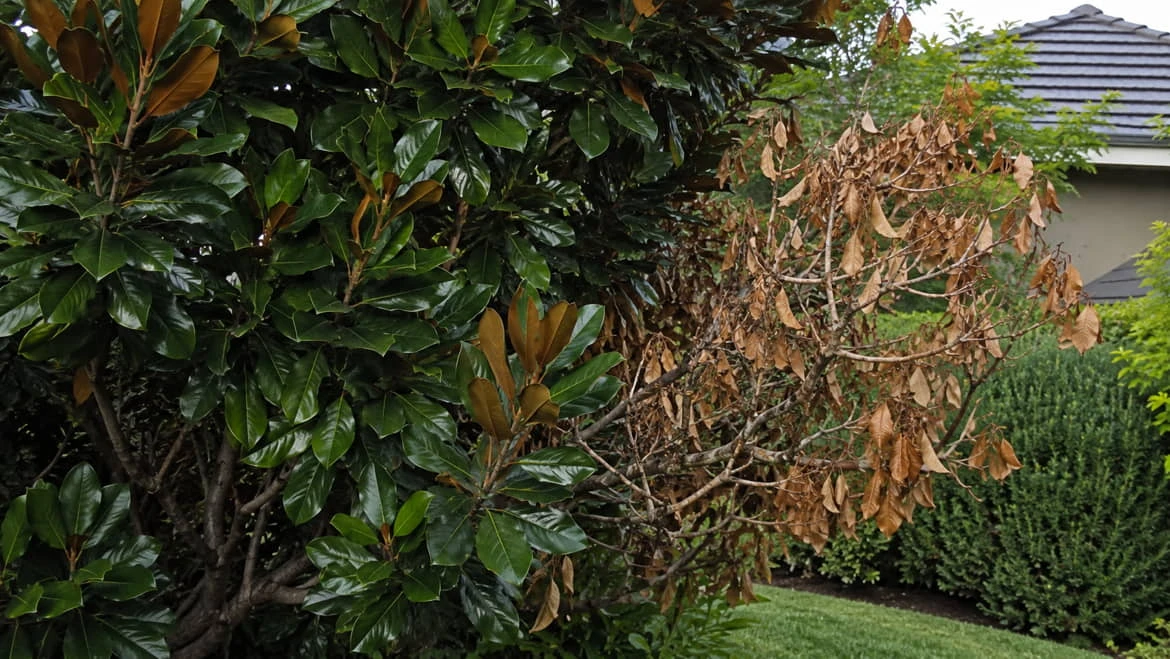
Do not begin by cutting random sections from the canopy.
Trace the affected branch from its dead tip towards the trunk. Look for the first point where healthy-looking bark changes to damaged, sunken, split or discoloured tissue.
Check:
- the branch tip
- leaf and bud condition
- small twigs
- pruning cuts
- branch junctions
- bark above and below the affected area
- ties, wire or rubbing points
- cracks on the underside of the branch
- damage where the branch joins the trunk
A canker or physical injury may partly or completely interrupt the movement of water through a branch. When damaged tissue encircles a branch, the growth beyond it can die because the conducting tissue has been girdled.
Bark Cracking, Sunken Lesions and Possible Cankers
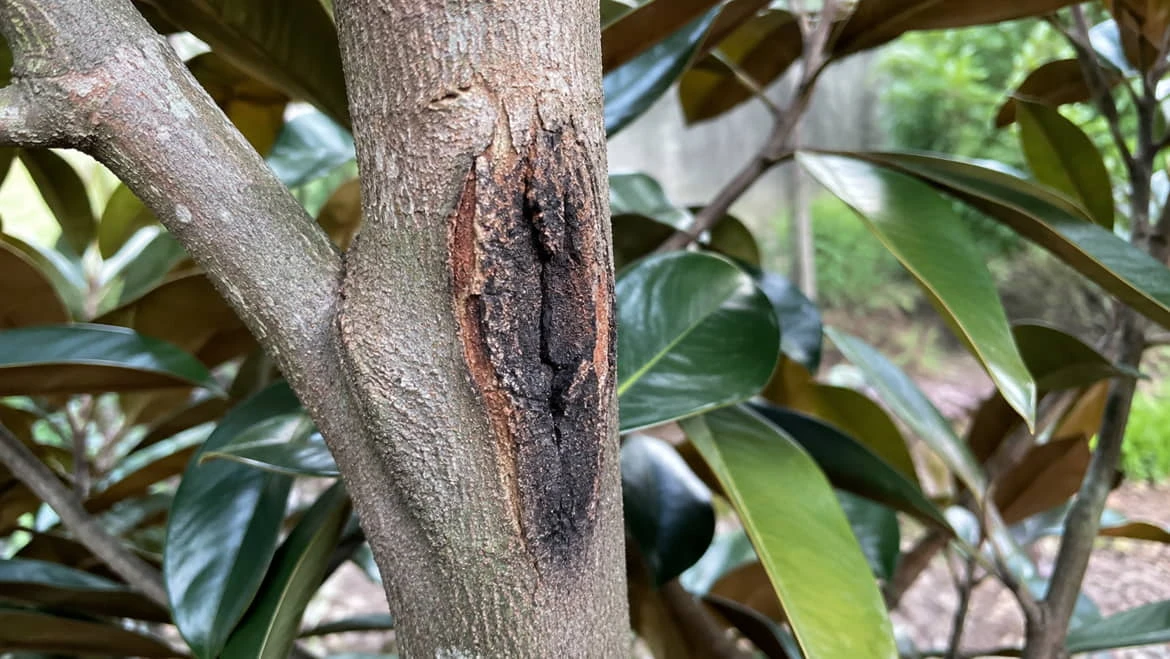
A canker is an area of dead or damaged bark and underlying tissue on a stem or branch. It may appear:
- sunken
- cracked
- darker or lighter than surrounding bark
- rough-edged
- callused around the margin
- elongated along the branch
- associated with dead growth beyond the lesion
- partly encircling the branch
Several canker-causing organisms are reported on magnolias, but the visible lesion alone does not reliably identify which organism is involved. University diagnostic resources list canker and dieback among Magnolia problems, while extension guidance emphasises that opportunistic canker organisms commonly exploit stressed or wounded trees. (University of Kentucky)
Canker does not always begin as an infection
The sequence may be:
- the branch is wounded or stressed
- bark and cambium are weakened
- opportunistic organisms colonise the damaged tissue
- the lesion expands
- growth beyond the damaged area declines
Stressors can include:
- drought
- waterlogging
- root injury
- severe pruning
- branch breakage
- heat injury
- frost injury
- machinery damage
- repeated rubbing
- poorly placed ties or stakes
This is why identifying the stress behind a canker can be as important as identifying the organism.
Do not name a pathogen from bark appearance alone
Sunken bark, peeling tissue, staining or dieback can occur with several unrelated problems.
A photograph may show that a lesion exists, but it may not prove whether the cause is fungal, bacterial, environmental or mechanical. Laboratory sampling may be needed where the diagnosis would change management.
Do not scrape large areas of bark away or repeatedly cut into the trunk in search of a colour change. That creates additional wounds and can make professional assessment harder.
Is the Branch Actually Dead?
A branch with brown leaves is not always dead from tip to base.
Start with the flexible-tip check
On a small accessible shoot:
- bend it gently
- living shoots are usually more flexible
- dead shoots are often brittle and snap easily
- inspect buds for firmness and normal colour
- compare with a healthy shoot from the same tree
Use a limited scratch check only when necessary
On a small twig, lightly scrape a tiny area of outer bark:
- moist green tissue beneath suggests that section is alive
- dry brown tissue suggests that small section may be dead
Do not perform repeated scratches along major branches or the trunk. The test is crude, creates wounds and does not diagnose why the tissue died.
If the branch is large, high, split or capable of falling, leave assessment and pruning to a qualified arborist.
Root Stress and Poor Drainage
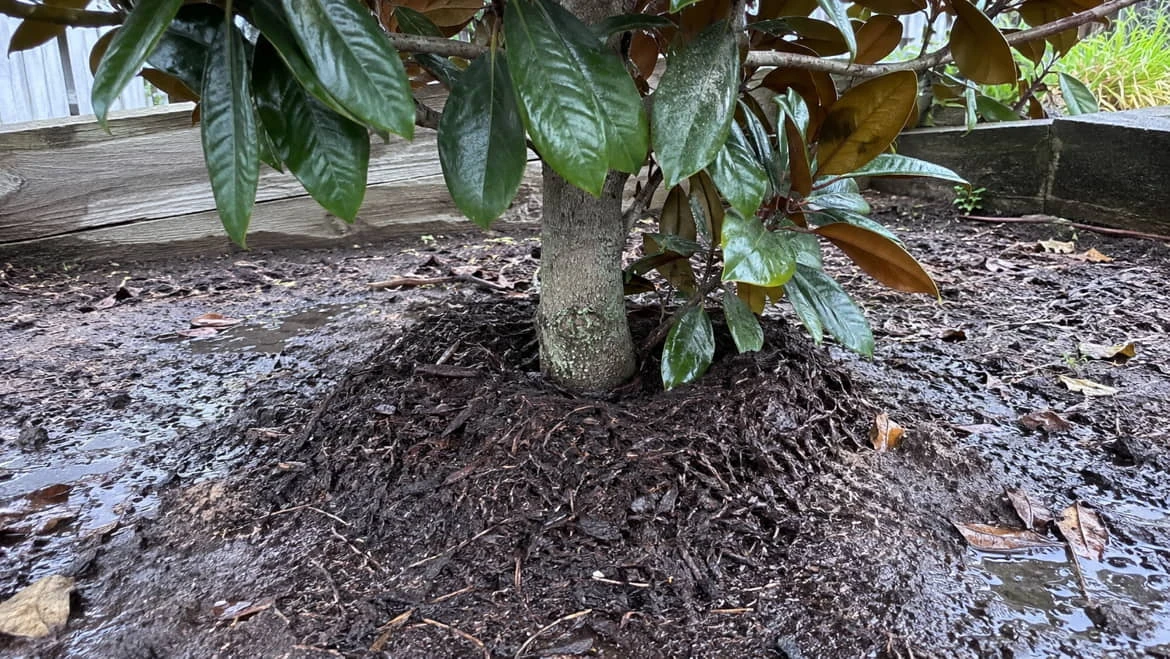
When several branches decline, the visible damage may begin below ground.
Roots need both moisture and oxygen. Soil that remains saturated can restrict oxygen, damage fine roots and reduce water uptake even though the soil looks wet. Prolonged dry conditions can also kill fine roots and interrupt water supply.
Queensland biosecurity guidance describes root-infecting diseases as producing non-specific above-ground symptoms such as reduced growth, yellowing, twig dieback and eventual decline. These symptoms do not identify the responsible organism by themselves. (Business Queensland)
Check the soil, not the calendar
Inspect the soil in more than one location:
- inside the original root ball
- just outside the root ball
- beneath mulch
- on the wettest side of the planting area
- on the driest exposed side
The original root ball and surrounding soil can hold very different amounts of moisture. A recently planted Magnolia may have a dry root ball sitting within wet surrounding soil, or a saturated root ball within soil that appears dry at the surface.
Do not decide to irrigate merely because a certain number of days has passed.
Signs that drainage may be involved
Look for:
- water remaining in the planting area after rain
- a sour or stagnant smell
- persistently soft soil
- blackened or decaying fine roots where safely visible
- moss or moisture-loving weeds concentrated around the base
- decline following installation of paving or irrigation
- the tree sitting in a low point
- soil piled against the trunk
- a root flare that cannot be seen
Planting too deeply and poor drainage are recognised causes of chronic transplant and root stress. A buried root flare can also increase the risk of decay around the base. (UGA Extension)
For planting-depth, drainage and establishment checks, use our Teddy Bear Magnolia planting and care guide.
Transplant Stress in Recently Planted Magnolias
A newly planted Teddy Bear Magnolia may look healthy at first because stored moisture and energy support the existing canopy. Decline can appear later if the reduced or restricted root system cannot support the foliage during heat, wind or dry weather.
Possible transplant-related causes include:
- damaged roots
- a disturbed or broken root ball
- planting too deeply
- the root flare buried beneath soil or mulch
- root-ball moisture differing from surrounding soil
- poor drainage
- excessive irrigation
- the root ball drying out
- roots circling within the original container
- movement at the trunk-root-ball junction
- reflected heat from paving or walls
Extension guidance notes that transplant shock and root stress may result from planting depth, drainage, root-ball damage and overwatering, while research and horticultural references describe transplanting as a period of impaired water uptake and possible shoot dieback. (UGA Extension)
Do not force recovery with fertiliser
A stressed root system may not be able to support a flush of new growth.
Do not apply fertiliser merely because branches are thinning. First determine whether the roots are wet, dry, restricted, damaged or deprived of oxygen. University of Georgia Extension cautions that fertilising a stressed or recently transplanted tree can stimulate new growth and increase demand on a root system that is already struggling. (UGA Extension)
Construction, Paving and Physical Root Damage
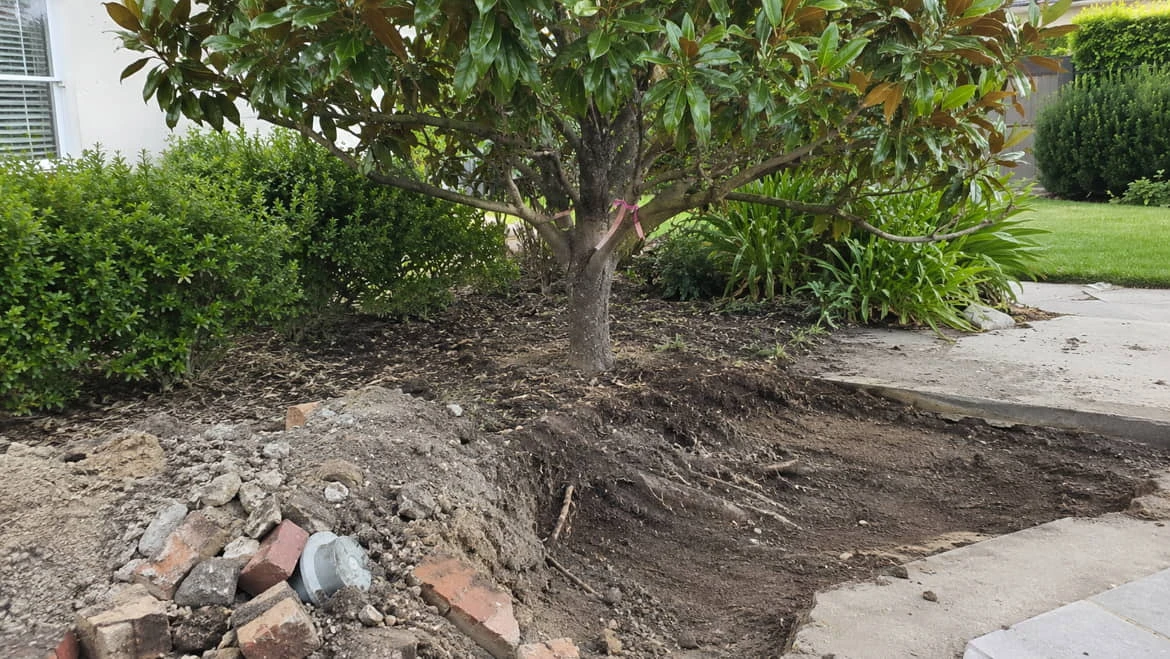
Branch decline can appear months or longer after work around the tree.
Common causes include:
- trenching for pipes or cables
- excavation
- paving over the root zone
- soil compaction from machinery
- vehicles parking beneath the canopy
- raising the soil level
- removing soil
- severing roots during edging or landscaping
- changes to drainage
- concrete or building materials altering surrounding soil conditions
Roots frequently extend beyond the visible canopy. Damage on one side of the root system can contribute to decline on the corresponding side of the crown, although the pattern is not always exact.
Tree-care guidance consistently recognises compaction and root severing as significant stressors, while construction guidance notes that trenching through the root zone can remove a large proportion of functioning roots and lead to one-sided canopy dieback. (Iowa State University Extension)
Questions to ask
Think back over the previous seasons:
- Was a path, driveway, retaining wall or garden bed installed?
- Were irrigation lines or utilities trenched nearby?
- Was fill soil added?
- Was the soil repeatedly driven over?
- Were surface roots cut?
- Did drainage change after construction?
- Did one side begin declining after the work?
Do not assume that the most recent visible symptom began at the same time as the original injury.
Wind, Frost, Heat and Mechanical Injury
Environmental and physical damage can kill a shoot or branch without an infectious disease being present.
Wind and branch movement
Strong wind can:
- split a branch at its junction
- tear bark
- damage a weak attachment
- loosen a recently planted root ball
- repeatedly rub branches together
- dry exposed foliage and shoot tips
Inspect the underside of branches and narrow junctions, where cracks can be difficult to see from above.
Frost or cold injury
Cold injury may damage buds, shoots or cambium. Affected tissue can become brown, blackened or shrivelled, and branch or top dieback may follow where conducting tissue has been damaged. (UGA Extension)
Australian frost exposure varies greatly between regions and individual garden positions. Do not transfer overseas seasonal advice directly to an Australian garden. Compare exposed growth with branches protected by buildings, fences or surrounding vegetation.
Heat and reflected radiation
Branches near west-facing walls, dark fences, paving or artificial surfaces may experience greater heat and water demand.
Heat injury is more plausible when:
- decline is strongest on the exposed side
- bark is damaged on the same side
- nearby sheltered growth remains healthier
- symptoms followed extreme heat or hot wind
- roots were already restricted or dry
Tools, ties and maintenance damage
Inspect for:
- mower or line-trimmer injury at the base
- ties cutting into stems
- wire left around branches
- staking that rubs the trunk
- pruning cuts made flush with the trunk
- torn rather than cleanly cut branches
- repeated impacts from gates, vehicles or equipment
Remove an active source of rubbing or constriction where this can be done safely, but do not carve into established wounds.
Could It Be Wilt?
“Wilt” describes a symptom. It is not a diagnosis by itself.
Branches may wilt when water movement is interrupted by:
- dry roots
- waterlogged or damaged roots
- girdling
- branch injury
- cankers
- vascular dysfunction
- severe heat
- transplant stress
Some vascular diseases can produce one-sided branch decline and discolouration in the sapwood. University diagnostic guidance includes wilt among possible Magnolia problems and notes that leaf symptoms may initially occur on one or several branches. (University of Kentucky)
However, this does not mean a Teddy Bear Magnolia with one dying branch has Verticillium wilt.
Do not diagnose vascular disease from a photograph
Confirmation may require:
- correctly selected sapwood samples
- laboratory testing
- exclusion of root and bark damage
- assessment of symptom progression
- inspection by an arborist or plant pathologist
Avoid writing “Verticillium” on a diagnosis based only on brown leaves, dark wood or one dead branch.
What About Root Rot?
Root rot is another broad description rather than a complete diagnosis.
Possible warning signs include:
- decline across several branches
- reduced canopy density
- small or pale leaves
- repeated twig death
- poor growth despite suitable weather
- persistently wet soil
- decayed roots
- bark damage near the base
- fungal structures near the trunk or roots
- instability or movement at the base
Armillaria and other root diseases can cause general decline, yellowing, reduced leaf growth and twig dieback, but these symptoms overlap heavily with waterlogging, drought, compaction and root injury. (Business Queensland)
Do not identify a root pathogen merely because the soil is wet or the canopy is thin.
Where structural roots, trunk stability or extensive decay may be involved, arrange an arborist assessment before digging around the base.
What to Do Before Pruning
Dead branches may eventually need removal, but pruning should follow inspection rather than replace it.
Before cutting:
- identify where living tissue ends
- check for bark lesions or splitting
- photograph the branch and junction
- inspect the same area on the opposite side
- check whether several branches share the same pattern
- inspect the root zone
- review recent weather and site work
- consider whether a sample may be needed
Removing a branch before recording the symptoms can destroy useful diagnostic evidence.
Safe pruning boundaries
Small, clearly dead branches may be removed with clean, sharp tools where they can be reached safely.
Do not:
- leave long dead stubs
- cut flush into the trunk
- remove large structural limbs without assessing the attachment
- climb an unstable tree
- cut through active power-line clearances
- coat every pruning wound with paint or sealant
- remove large amounts of healthy canopy to “balance” damaged roots
For large limbs, extensive dieback or uncertain branch structure, use a qualified arborist.
Australian Pesticide and Fungicide Rule
Do not select a fungicide because an overseas page associates a particular active ingredient with “magnolia canker” or “wilt”.
Where a chemical treatment is proposed, use only an APVMA-registered product whose current label covers:
- the identified disease or pest
- ornamental plants or the relevant use site
- the intended method of application
An active ingredient appearing in overseas advice does not establish that an Australian product is registered or suitable for this situation.
Most branch-decline cases should not begin with a spray. Cankered, girdled, dead or physically damaged wood will not be restored by coating the leaves.
When to Call an Arborist or Plant-Health Service
Arrange professional assessment when:
- a large branch is dead, split or likely to fall
- decline is progressing rapidly
- several major branches are affected
- a canker is approaching or encircling the trunk
- bark is sunken or cracking near the base
- fungal structures appear around the trunk or roots
- the tree moves unusually at ground level
- construction has damaged major roots
- power lines or buildings are within reach
- the cause remains unclear after soil and bark checks
- treatment depends on identifying a specific pathogen
A laboratory diagnosis is most useful when it will change management. Random samples of dry dead wood may not contain the active margin of a disease, so ask the laboratory or arborist what material is required before cutting.
A Practical Diagnostic Order
1. Map the pattern
Is the decline limited to one branch, one side or the whole canopy?
2. Follow the branch backwards
Find the first point where healthy growth changes to dead or damaged tissue.
3. Inspect the bark
Look for cracks, wounds, sunken lesions, girdling, ties and split junctions.
4. Check recent history
Review transplanting, pruning, storms, frost, heat, digging, paving and irrigation changes.
5. Inspect the root flare and soil
Check whether the root flare is visible and whether the root zone is wet, dry, compacted or buried.
6. Compare the original root ball with surrounding soil
Do not assume they hold the same amount of moisture.
7. Photograph before cutting
Capture the leaves, branch tip, bark lesion, branch junction, trunk base and wider canopy.
8. Prune or treat only after diagnosis
Do not use fertiliser, pesticide or fungicide as a substitute for finding where decline begins.
For broader symptoms such as yellow leaves, pests or general decline, use our Teddy Bear Magnolia problems and fixes guide.
If branch stress is accompanied by missing or failing flower buds, see why your Teddy Bear Magnolia is not flowering.
For cultivar size, growth habit and long-term placement, return to our Teddy Bear Magnolia size and growth guide.
Frequently Asked Questions
Why is only one branch dying on my Teddy Bear Magnolia?
One dying branch often points to a local problem such as bark injury, a canker, a split branch, girdling, pruning damage or root injury on that side. Follow the branch back towards the trunk and inspect the bark and junction before treating the whole tree.
How can I tell whether a Magnolia branch is dead?
Small dead shoots are usually brittle, have dry buds and show brown tissue beneath a tiny scratch in the outer bark. Living shoots are generally more flexible and may show moist green tissue. Avoid repeated scratching, especially on large branches or the trunk.
What does a canker look like on a Magnolia branch?
A possible canker may appear sunken, cracked, discoloured, rough-edged or surrounded by callused tissue. Growth beyond the lesion may decline if damaged tissue partly or completely encircles the branch. Appearance alone does not identify the responsible organism.
Can poor drainage cause Magnolia branches to die?
Yes. Persistently saturated soil can reduce oxygen around the roots, damage fine roots and limit water uptake, leading to weak growth and twig or branch dieback. Check actual soil moisture and drainage rather than watering according to a fixed calendar.
Can transplant shock cause branch dieback?
Yes. A recently planted Magnolia may develop dead shoots if its root system cannot support the canopy. Planting depth, root-ball moisture, drainage, root damage, heat and wind can all affect establishment.
Can construction work cause one side of a Magnolia to die?
It can. Trenching, paving, compaction, raised soil levels and severed roots may damage the roots supplying part of the canopy. Symptoms may not appear immediately after the work.
Does one dying branch mean my Magnolia has wilt disease?
No. One-sided decline can also result from branch injury, cankers, root damage, water stress or girdling. Vascular disease should not be diagnosed from a photograph or leaf colour alone and may require laboratory testing.
Should I fertilise a Teddy Bear Magnolia with dying branches?
Not until the cause is understood. Fertiliser will not repair dead wood, severed roots, waterlogged soil or a girdled branch, and forcing new growth can increase demand on an already stressed root system.
Should I remove a dying Magnolia branch immediately?
Remove small, clearly dead branches only when the work is safe and the symptoms have been documented. Large, split, cankered or structurally important branches should be assessed by a qualified arborist before cutting.
When is Magnolia branch dieback an emergency?
Treat it as urgent when a large limb could fall, the trunk or major branch is split, the tree is unstable, major roots have been damaged, or decline is rapidly affecting several structural branches.
Final Thoughts
The most important clue is not simply that a branch has turned brown.
Ask where the decline begins:
- in one branch or bark lesion
- on one side after root disturbance
- across the whole canopy from root-zone stress
- after transplanting
- after wind, frost, heat or physical damage
Then inspect the branch, bark and soil before choosing a treatment.
A dead branch cannot be restored with fertiliser or a spray. The useful decision is whether the tree needs local pruning, root-zone correction, monitoring, laboratory diagnosis or professional arboricultural assessment.